单张(颜色)纹理
一、知识回顾
fixed4 tex2D(sampler2D tex,float2 s) 传入纹理图片和 UV 坐标 返回纹理图片中对应位置的颜色值
二、书写单张纹理颜色采样的 Shader
- 完成 Shader 文件的基本结构
- 纹理属性和 CD 成员变量的声明
- 关键知识点: CG 映射的 ShaderLab 中的纹理属性,需要有两个成员变量
- 如何声明
- ShaderLab 中的属性 图片属性(2D)---主要利用 UV 坐标提取其中的颜色
- CG 映射的成员变量
- sampler2D 用于映射纹理图片
- float4 用于映射纹理图片的缩放和平移 固定命名方式 纹理名_ST(S 代表 scale 缩放 T 代表 translation 平移)
- 用缩放平移参数参与 UV 值的计算
- 如何获取模型中携带的 UV 信息
- 在顶点着色器中,我们可以利用 TEXCOORD 语义获取到模型中的纹理坐标信息,它是一个 float4 类型
- xy 获取纹理坐标的水平和垂直坐标
- zw 获取到的是纹理携带的一些额外信息,例如深度值等
- 如何计算
- 固定算法 先缩放,后平移 缩放用乘法,平移用加法 纹理坐标.xy * 纹理名_ST + 纹理名_ST.zw
- 内置宏 TRANSFORM_TEX(纹理坐标变量,纹理变量)
- 在片元着色器中进行纹理颜色采样
三、实例代码
1
2
3
4
5
6
7
8
9
10
11
12
13
14
15
16
17
18
19
20
21
22
23
24
25
26
27
28
29
30
31
32
33
34
35
36
37
38
39
40
41
42
43
44
45
46
| Shader "Unlit/Lesson48"
{
Properties
{
_MainTex("MainTex",2D) = ""{}
}
SubShader
{
Pass
{
CGPROGRAM
#pragma vertex vert
#pragma fragment frag
#include "UnityCG.cginc"
sampler2D _MainTex;
float4 _MainTex_ST;
v2f_img vert (appdata_base v)
{
v2f_img data;
data.pos = UnityObjectToClipPos(v.vertex);
data.uv = v.texcoord.xy * _MainTex_ST.xy + _MainTex_ST.zw;
TRANSFORM_TEX(v.texcoord.xy,_MainTex);
return data;
}
fixed4 frag (v2f_img i) : SV_Target
{
fixed4 color = tex2D(_MainTex,i.uv);
return color;
}
ENDCG
}
}
}
|
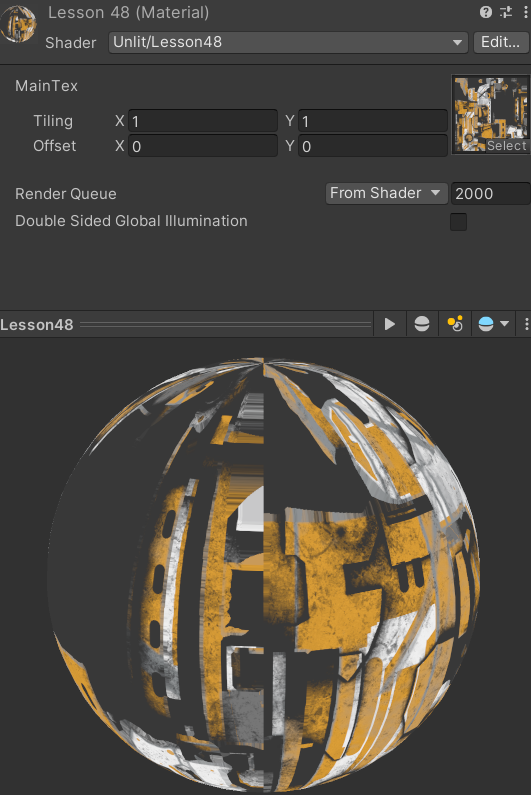
四、实现效果
五、结合光照模型(以 BlinnPhong 模型为例子)
1.注意事项
- 纹理颜色和漫反射颜色进行乘法叠加,他们俩个共同影响最终的颜色
- 兰伯特光照模型计算时,漫反射材质颜色使用 1 中的颜色进行乘法叠加运算
- 最终效果使用环境光叠加时,环境光变量 UNITY_LIGHTING_AMBIENT 需要和 1 中的颜色进行乘法叠加 主要是为了避免最终的渲染效果偏灰色
2.实例代码
1
2
3
4
5
6
7
8
9
10
11
12
13
14
15
16
17
18
19
20
21
22
23
24
25
26
27
28
29
30
31
32
33
34
35
36
37
38
39
40
41
42
43
44
45
46
47
48
49
50
51
52
53
54
55
56
57
58
59
60
61
62
63
64
65
66
67
68
69
70
71
72
73
74
75
76
77
78
79
80
81
82
83
84
85
86
87
88
89
90
| Shader "Unlit/BlinnPhong_Sampler2D"
{
Properties
{
_MainTex("MainTex",2D)=""{}
_MainColor("MainColor",Color)=(1,1,1,1)
_SpecularColor("SpecularColor",Color)=(1,1,1,1)
_SpecularNum("SpecularNum",Range(0,20))=15
}
SubShader
{
Pass
{
Tags{"LightMode"="ForwardBase"}
CGPROGRAM
#pragma vertex vert
#pragma fragment frag
#include "UnityCG.cginc"
#include "Lighting.cginc"
sampler2D _MainTex;
float4 _MainTex_ST;
fixed4 _MainColor;
fixed4 _SpecularColor;
float _SpecularNum;
struct v2f
{
float4 pos:POSITION;
float2 uv:TEXCOORD0;
float3 wNormal:NORMAL;
float3 wPos:TEXCOORD1;
};
v2f vert (appdata_base v)
{
v2f data;
data.pos = UnityObjectToClipPos(v.vertex);
data.uv = v.texcoord.xy *_MainTex_ST.xy + _MainTex_ST.zw;
data.wNormal = UnityObjectToWorldNormal(v.normal);
data.wPos = mul(UNITY_MATRIX_M,v.vertex);
return data;
}
fixed4 frag (v2f i) : SV_Target
{
fixed3 albedo = tex2D(_MainTex,i.uv).rgb * _MainColor.rgb;
float3 lightDir = normalize(_WorldSpaceLightPos0.xyz);
fixed3 lambertColor = _LightColor0.rgb * albedo.rgb *max(0,dot(i.wNormal,lightDir));
float3 viewDir = normalize(UnityWorldSpaceViewDir(i.wPos));
float3 halfA = normalize(viewDir + lightDir);
fixed3 specularColor = _LightColor0.rgb * _SpecularColor * pow(max(0,dot(i.wNormal,halfA)),_SpecularNum);
fixed3 color = UNITY_LIGHTMODEL_AMBIENT.rgb * albedo.rgb + lambertColor + specularColor;
return fixed4(color.rgb,1);
}
ENDCG
}
}
}
|
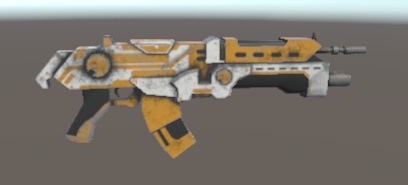
4.实现效果
 2024-09-03 173608.png